Replacing switches or keycaps on a custom mechanical keyboard is one of the easiest and most satisfying upgrades you can make. Whether you want a new typing feel, improved acoustics, or a fresh aesthetic, learning how to safely remove and install switches and keycaps is essential. Done correctly, this process protects your PCB, stabilizers, and hot-swap sockets while extending the lifespan of your mechanical keyboard.
This step-by-step guide explains how to replace mechanical keyboard switches and keycaps safely, whether you’re working with a hot-swappable keyboard or a soldered PCB build.
Before You Start: Check Your Keyboard Type
Before removing anything, determine whether your keyboard is hot-swappable or soldered:
- Hot-swappable keyboard: Switches can be removed without soldering. These use hot-swap sockets on the PCB.
- Soldered keyboard: Switches are soldered directly to the PCB and require desoldering tools for removal.
Attempting to pull switches from a soldered keyboard without desoldering can permanently damage your PCB and switches.
Tools You’ll Need
- Keycap puller (wire puller recommended)
- Switch puller (for hot-swappable boards)
- Switch opener (optional for lubrication)
- Soldering iron and desoldering pump (for soldered keyboards)
- Tweezers
- Soft cloth or desk mat
Using proper keyboard tools reduces the risk of bent switch pins, cracked keycaps, or damaged stabilizers.
How to Remove Keycaps Safely
Replacing keycaps is the simplest keyboard modification. Follow these steps:
- Turn off and unplug your keyboard.
- Use a wire keycap puller and slide it gently over the keycap.
- Pull straight up with even pressure.
- For larger keys (spacebar, shift, enter), pull gently from both sides to avoid damaging stabilizers.
Tip: Avoid twisting keycaps when removing them. Twisting can crack the stem or stress the switch housing.
If your keyboard uses Cherry MX-style switches, most aftermarket keycaps (PBT, ABS, double-shot, dye-sub) will be compatible.
How to Install New Keycaps
- Align the keycap stem with the switch stem (cross-shaped for MX-style switches).
- Press down firmly and evenly until seated.
- For stabilized keys, attach the stabilizer inserts before pressing down completely.
Ensure proper alignment to prevent crooked keycaps or uneven typing feel. Check that stabilizers are clipped in properly to avoid rattling.
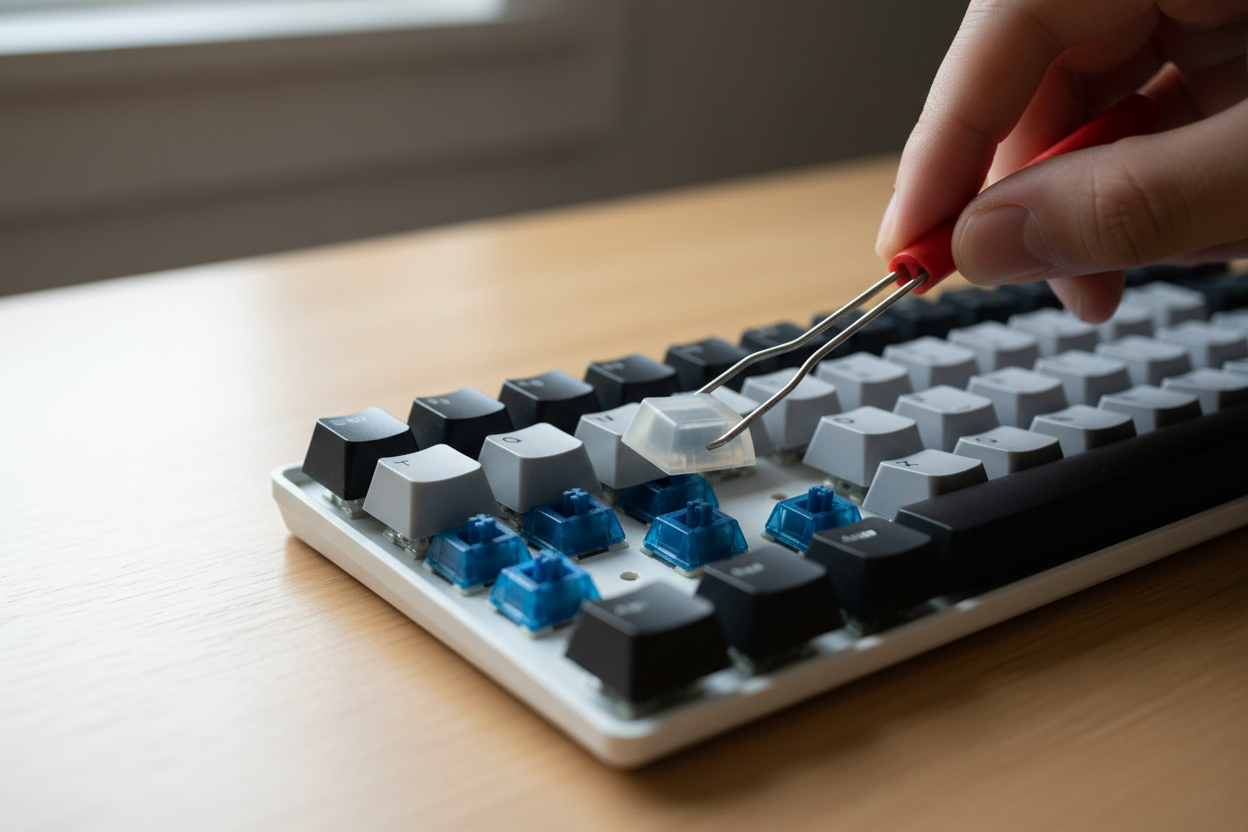
How to Replace Switches on a Hot-Swappable Keyboard
Hot-swappable mechanical keyboards make switch replacement simple and safe when done properly.
- Remove the keycaps first.
- Insert the switch puller onto the top and bottom tabs of the switch.
- Squeeze gently and pull straight up.
- Inspect the switch pins before installing a new switch.
- Align the new switch pins with the PCB hot-swap socket.
- Press down evenly until fully seated.
Important: Never force a switch into the PCB. Bent pins can damage hot-swap sockets and cause keys not to register.
How to Replace Switches on a Soldered Keyboard
If your keyboard is soldered, replacing switches requires more care and technical skill.
- Disassemble the keyboard case.
- Heat each solder joint with a soldering iron.
- Use a desoldering pump or wick to remove solder.
- Gently remove the switch once all solder is cleared.
- Insert the new switch and solder it into place.
Be careful not to overheat the PCB pads, as this can cause pad lifting or permanent damage.
Common Mistakes to Avoid
- Pulling switches from a non-hot-swap PCB without desoldering
- Bending switch pins before installation
- Forcing switches into misaligned sockets
- Damaging stabilizers when removing large keycaps
- Using cheap plastic keycap pullers that scratch keycaps
How Switch Replacement Affects Sound and Feel
Changing switches dramatically impacts typing feel, sound profile, and performance. Linear switches offer smooth keystrokes, tactile switches provide feedback bumps, and clicky switches produce audible clicks. Replacing switches can make your keyboard feel softer, stiffer, quieter, or louder depending on your choice.
Pairing new switches with different plate materials, mounting styles, foam mods, or case materials can further customize acoustics and typing comfort.
When Should You Replace Switches or Keycaps?
- If keys feel scratchy or inconsistent
- If switches are failing or double-registering
- If you want a new sound profile (thocky, clacky, muted)
- If keycaps are shiny or worn (common with ABS keycaps)
- If you want to upgrade to PBT keycaps for durability
Final Thoughts
Learning how to replace switches or keycaps safely on a custom mechanical keyboard allows you to upgrade performance, improve acoustics, and personalize your setup without buying a new board. Whether you’re using a hot-swappable keyboard or a soldered PCB, following proper removal and installation steps protects your keyboard components and ensures long-term reliability.
With the right tools and careful technique, switch swapping and keycap replacement become simple, safe, and rewarding parts of the mechanical keyboard hobby.