Force curves are the secret blueprint behind how a mechanical keyboard switch feels and performs. Whether you’re a gamer chasing speed, a writer chasing comfort, or a keyboard hobbyist chasing perfect acoustics, understanding force curves — also called force-travel curves or force-displacement curves — will help you choose the right mechanical switches (linear, tactile, or clicky) and tune your keyboard for typing feel, actuation, and sound.
Quick overview — force curves in one sentence
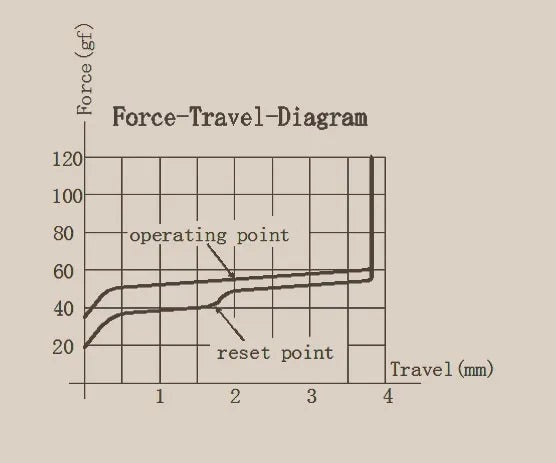
A force curve graphs the force (usually measured in grams or centinewtons) required to push a switch stem at every point of its travel — revealing the switch’s tactile bump, actuation force, and bottom-out weight.
Why force curves matter (TL;DR)
- Typing feel: The shape of the force curve defines whether a switch feels smooth, light, heavy, or snappy.
- Performance: Actuation force and pre-travel affect typing speed and error rate — important for gamers and fast typists.
- Comfort and fatigue: Lower overall force and gentle curves reduce finger fatigue during long typing sessions.
- Modding & sound tuning: Knowing the force curve helps you predict how spring swaps, lubing, or stem/housing changes will alter feel and acoustics.
Force curve basics — the axes and the important points
On the graph, the x-axis is travel distance (usually from 0 mm to full travel ~4 mm), and the y-axis is force required (grams or cN). Key points to look for:
- Pre-travel: Distance from rest to actuation point (where the switch sends the keypress).
- Actuation force: Force at the actuation point — often quoted in specs (e.g., 45 g).
- Tactile bump: A local peak or plateau on tactile switches where force briefly increases before dropping.
- Bottom-out force: Force at the end of travel (how hard it feels to fully compress the switch).
- Return force / hysteresis: The force profile when the key is released; differences here affect rebound feel.
Common force curve shapes and what they feel like
Linear
A smooth, mostly flat line from top to bottom. Linear switches (e.g., many Gateron, Cherry MX Reds-style) feel consistent and predictable with no tactile bump — great for fast gaming keypresses and smooth bottom-outs.
Tactile
Shows a small bump on the curve before actuation or at actuation. Tactile switches (e.g., Cherry MX Brown-style) give a noticeable “bump” that provides typing feedback — helpful for typists who want confirmation without loud clicks.
Clicky
Similar to tactile curves but paired with a mechanism that produces an audible click. The force curve often has a sharper transition around the click point.
Progressive / Variable
Some springs or designs create a curve that slopes upward more steeply near the bottom — you feel increasing resistance the further you press. These can reduce accidental bottom-outs and provide a “firm” finish to keypresses.
How force curves affect real-world typing and gaming
Speed vs. accuracy: Low actuation force and shallow pre-travel favor speed but can lead to accidental presses. A tactile bump or slightly higher actuation force can improve accuracy by providing sensory feedback.
Fatigue: If the total integrated area under the force curve is high (meaning you constantly push against higher force), you’ll fatigue faster during long sessions.
Sound & feel synergy: Force curves interact with case material, keycap profile, plate material, and stabilizers to produce the final acoustics and vibration. Two switches with similar force specs can still sound and feel different because of curve shape.
How to read manufacturer force specs vs. real force curves
Manufacturers often quote single numbers like “45 g actuation force.” That’s useful but incomplete. The single number doesn’t tell you where the actuation occurs in travel, the size of any tactile bump, or how hard bottoming out feels. Real force curves (measured with a force gauge) reveal the full profile and are a better predictor of subjective feel.
How to measure or examine a force curve
- Use a force gauge or switch force tester that records force vs travel.
- Slowly press the stem and record force continuously from 0 mm to full travel.
- Plot force (y) against travel (x) to reveal the curve.
Hobby labs and reviewers often publish these graphs — look for them when comparing switches.
How mods change the force curve
- Spring swaps: Replace the spring to change actuation and bottom-out forces — shifts the entire curve up or down.
- Lubing: Reduces friction and smooths minor irregularities, making the curve appear smoother (less micro-variance).
- Stem/housing swaps: Alter tactile bumps or introduce new friction points that reshape the curve locally.
- Spring stacking / progressive springs: Create multi-stage resistance for a progressive curve.
Choosing a switch based on force curve — practical guide
When picking switches, consider:
- Typing focus: Prefer tactile or light linear with a subtle bump for long typing sessions to reduce errors and fatigue.
- Gaming focus: Low actuation force and short pre-travel linear switches favor rapid repeat presses and minimal resistance.
- Balanced use: Medium actuation force and a modest tactile bump are great for mixed typing and gaming.
- Noise concerns: Tactile vs clicky: tactile gives feedback without loud clicks; clicky are loud but satisfying for some typists.
FAQs — Fast answers
Q: Is a lower actuation force always better?
No — lower force can be faster but may increase accidental keypresses and finger fatigue if you over-press. Balance speed with control.
Q: Can lubing change the actuation force?
Lubing reduces friction and can slightly lower the perceived force and make the travel feel smoother, but it won’t dramatically change published actuation weights like a spring swap would.
Q: Should I choose based only on published grams (e.g., 45g)?
Don’t rely only on a single number. Seek real force curves, read reviews, and test switches in-person if possible to gauge pre-travel, tactile profile, and bottom-out weight.
Conclusion — why force curves deserve attention
Force curves are more than technical graphs — they map the tactile story of every keypress. They determine whether a switch feels smooth, snappy, spongy, or firm, and influence typing comfort, speed, and sound. If you want to tune your mechanical keyboard’s switch feel — whether through switch selection or mods like spring swaps and lubing — start by understanding the force curve. It gives you the vocabulary and the data to pick switches that match your typing goals.
Ready to choose your next switch? Look for force-travel graphs in reviews, test switches on a switch tester, and experiment with simple mods (spring swap, lubing) — you’ll quickly learn how curve shapes translate into real-world typing feel and performance.