

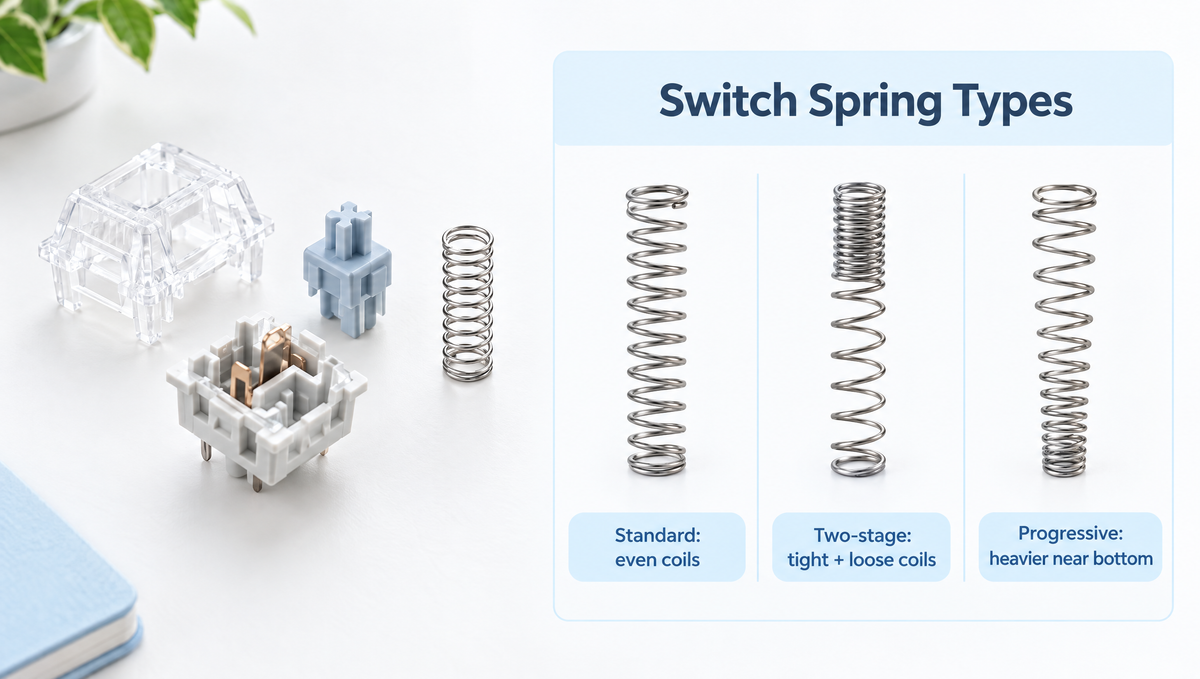
Keyboard Switch Springs Explained: The Part Nobody Talks About
Ask someone what makes a mechanical keyboard switch feel the way it does and you will usually hear about the stem, the housing, or the lube. But the keyboard switch spring is the component that actually pushes back against your finger for the entire keystroke. It sets the starting force, the bottom-out force, how quickly the key returns, and a surprising amount of the sound.
Most buying guides stop at spring weight in grams. That number only tells you part of the story. Two switches rated at the same actuation force can feel completely different because one uses a short, evenly wound spring and the other uses a long, multi-stage one.
This guide covers mechanical keyboard spring types, what spring length really changes, why preload matters, what causes spring ping, and how to pick switches by spring behaviour rather than a single gram rating.
What a Switch Spring Actually Does
Inside an MX-style switch, the spring sits in the bottom housing with the stem resting on top. Press the key and you compress it; let go and it pushes the stem back up. That simple job breaks down into four things you can feel:
- Starting force — how much effort it takes to get the key moving at all
- Actuation force — the force at the point where the keypress registers
- Bottom-out force — the force at the end of travel when the stem hits the bottom
- Return speed — how fast the spring resets the key for the next press
The shape of the curve connecting those points is what enthusiasts call the force curve, and the spring is the single biggest influence on it.
Preload: Why Switches Do Not Start at Zero Grams
Here is the concept that explains most of the confusion around spring feel. Preload is the force needed to begin moving the key at all, and it exists because the spring is already partly compressed while the switch is sitting at rest.
Switch housings are built slightly shorter than the uncompressed spring inside them, so the spring is already pushing upward before your finger touches the keycap. On a force curve, this shows up as a starting point above zero rather than at the origin.
Preload is not a flaw. Without it, the top of the keystroke would feel loose and slack. But the amount of preload changes a switch's character significantly:
- Higher preload gives a firmer, more defined top of stroke and a faster, snappier return
- Lower preload gives a lighter, softer initial press that some typists find more forgiving
And the easiest way to change preload without changing anything else is to change the length of the spring.
Spring Length: Short, Standard, and Extended Springs
Spring length is one of the most underrated variables in switch design. A standard MX-style spring commonly sits in the region of 14mm to 15mm. An extended spring, sometimes called a long spring, typically runs somewhere between 18mm and 22mm.
Drop a longer spring into the same housing and it has to compress further just to fit. That raises preload, which changes the feel immediately.
What extended springs change
- Firmer, more immediate top of stroke — less of a dead zone before the key starts moving
- Faster rebound — the spring is working harder throughout, so it resets more quickly
- A narrower force range — the gap between starting force and bottom-out force shrinks, making the stroke feel more consistent
Extended springs are common enough now that you will find them called out on product pages. The Kailh Box Spring Linear Switches use an extended 20mm spring specifically for improved rebound, paired with a high-slip POM base and the dustproof Box housing design. The Gateron Oil King Switches also run a 20mm plated spring, alongside a 55g actuation force, 2mm pre-travel, and 4.0mm total travel.
If one linear switch feels lively and another feels sluggish despite similar gram ratings, spring length is very often the answer.
Switch Spring Types: Single-Stage, Multi-Stage, and Progressive
Beyond length, springs differ in how they are wound. The spacing between coils — the pitch — determines how the force builds as the spring compresses.
Single-stage springs (standard)
Evenly spaced coils along the whole length. Force increases at a roughly steady rate as you press, which is the classic linear behaviour most stock switches use.
- Predictable and neutral — nothing surprising happens mid-stroke
- Often preferred in tactile switches, because a plain spring lets the tactile bump stand out rather than competing with it
Two-stage and multi-stage springs
These use sections of tighter and looser coil winding along a single spring. The loosely wound section compresses first, then the tighter section takes over, so the spring effectively behaves differently at different points in the stroke.
- Snappy, fast return — the most consistently reported characteristic
- Smaller force spread between the start of the press and bottom-out
- Popular in lighter linear switches, where a plain light spring can feel slow coming back up
Enthusiasts also report multi-stage designs tend to be less prone to audible spring noise, though this varies by manufacturer.
Progressive and conical springs
Progressive springs are wound so that resistance climbs more steeply as you approach the bottom of the stroke. Conical springs take it further by varying the coil diameter as well as the pitch.
- Light at the top, heavy at the bottom — a much bigger gap between actuation and bottom-out force
- Discourages bottoming out, which some typists use to reduce finger fatigue
- Often described as a cushioned or softer landing at the end of travel
Slow springs
A niche category that raises the initial force required without meaningfully raising the bottom-out weight. The goal is to reduce accidental keypresses while keeping the overall switch weight light.
The Stages vs Length Debate
Here is where the hobby genuinely disagrees. On keyboard forums, a long-running argument holds that the number of stages in a spring is largely marketing, and that spring length is doing most of the work.
The reasoning is straightforward: a multi-stage spring is usually also a longer spring, so the snappier return attributed to staging may simply be extra preload. Builders who have compared the two at matched lengths often report a far smaller difference than expected.
The takeaway is not that multi-stage springs are fake, but that staging alone is not worth a premium. Length, weight, stem material, and lube all contribute, and isolating one variable is harder than marketing copy suggests.
Spring Ping and Crunch: Causes and Fixes
That thin metallic ringing after a keypress is spring ping, and it comes from the spring itself vibrating inside the housing. A related complaint, spring crunch, is a gritty sound from coils rubbing against the housing walls or each other.
Longer springs can be more prone to both, simply because there is more metal in there under more tension. Common fixes:
- Bag lubing the springs — a light oil applied by shaking springs in a bag with a few drops, which damps vibration effectively
- Swapping to better-made springs — plated springs are generally marketed for corrosion resistance and smoother operation
- Buying pre-lubed switches — factory lubing does not always reach the spring, but higher-end pre-lubed switches usually sound cleaner out of the box
Worth knowing: switch films will not fix spring ping. Films address housing wobble and looseness, which is a different problem entirely. Case foam and tape mods will not fix it either, since the noise originates inside the switch.
How to Choose Switches Based on Spring Behaviour
You do not need to swap springs to benefit from understanding them. Use spring characteristics to shortlist switches instead.
- Want a fast, snappy gaming feel? Look for extended springs around 20mm and lighter weights. Browse linear switches.
- Want a defined tactile bump? A plain single-stage spring usually keeps the bump cleaner. Browse tactile switches — the Gateron Baby Kangaroo 2.0 Switches use a 0.5mm tactile peak point for a more pronounced tactile drop.
- Typing long hours and getting sore fingers? Lighter springs reduce total effort, but very light springs can increase typos.
The full range is in the key switches collection.
Spring Swapping: Is It Worth Doing?
Spring swapping means opening every switch and replacing the factory spring. It is the most tedious mod in the hobby and one of the most effective, because it changes weight and return behaviour without altering the sound signature much.
The rough process:
- Unplug the keyboard and remove the keycaps with a keycap puller
- Pull the switches from the hot-swap sockets with a switch puller
- Open each switch housing to expose the stem and spring
- Lift out the stem, replace the spring, and seat the new one centred in the bottom housing
- Reassemble, reseat the switches, and test every key before putting the keycaps back
A 2-in-1 removal tool such as the Glacier Keycap/Key Switch Tool handles the first two steps without bending pins. More options are in the keyboard tools collection.
Honest advice: for most people, buying switches with the spring behaviour you want is far more sensible than swapping springs on 80-plus switches. Spring swapping makes sense when you already love a switch and only want to change its weight.
Frequently Asked Questions About Keyboard Switch Springs
Does spring length change how heavy a switch feels?
Yes, but mostly at the start of the stroke. A longer spring in the same housing sits more compressed at rest, which raises preload and makes the key feel firmer immediately. It also speeds up the return. The bottom-out force changes less dramatically than the initial force does.
Are two-stage springs actually better than single-stage springs?
They are different rather than strictly better. Two-stage and multi-stage springs are widely reported to give a snappier return and a narrower force range, which suits light linear switches. Many builders prefer plain single-stage springs in tactile switches so the bump stays distinct. There is also an active debate over how much of the effect comes from the staging versus the spring simply being longer.
What causes spring ping and how do I stop it?
Spring ping is the spring vibrating inside the switch housing after a keypress. The most reliable fix is lubricating the springs, usually by bag lubing them with a light oil. Switching to better-quality plated springs also helps. Foam mods and switch films will not fix it, because the noise is generated inside the switch itself.
Do I need to replace springs to change how my keyboard feels?
No. Swapping to a different switch is easier, faster, and usually cheaper than replacing springs in every switch. On a hot-swap keyboard you can change the entire feel of the board in a few minutes with a switch puller. Spring swapping is worth considering only when you want to keep a switch you already like but adjust its weight.
What spring weight should a beginner start with?
Something in the middle, generally in the 45g to 60g range. Very light springs increase accidental keypresses while you adapt, and very heavy springs cause fatigue during long typing sessions. Trying a few weights before committing to a full set is the most reliable way to find your preference.
Final Thoughts on Switch Springs
The spring is the only part of a switch that pushes back at you for the entire keystroke, and it deserves more attention than a single gram rating on a product page. Spring length sets preload and return speed. Coil winding shapes how force builds. Spring quality and lubrication determine whether you hear a clean thock or a thin metallic ring.
Read switch descriptions with springs in mind and terms like extended 20mm spring or multi-stage winding stop being marketing noise — they start telling you how a switch will actually feel.


