

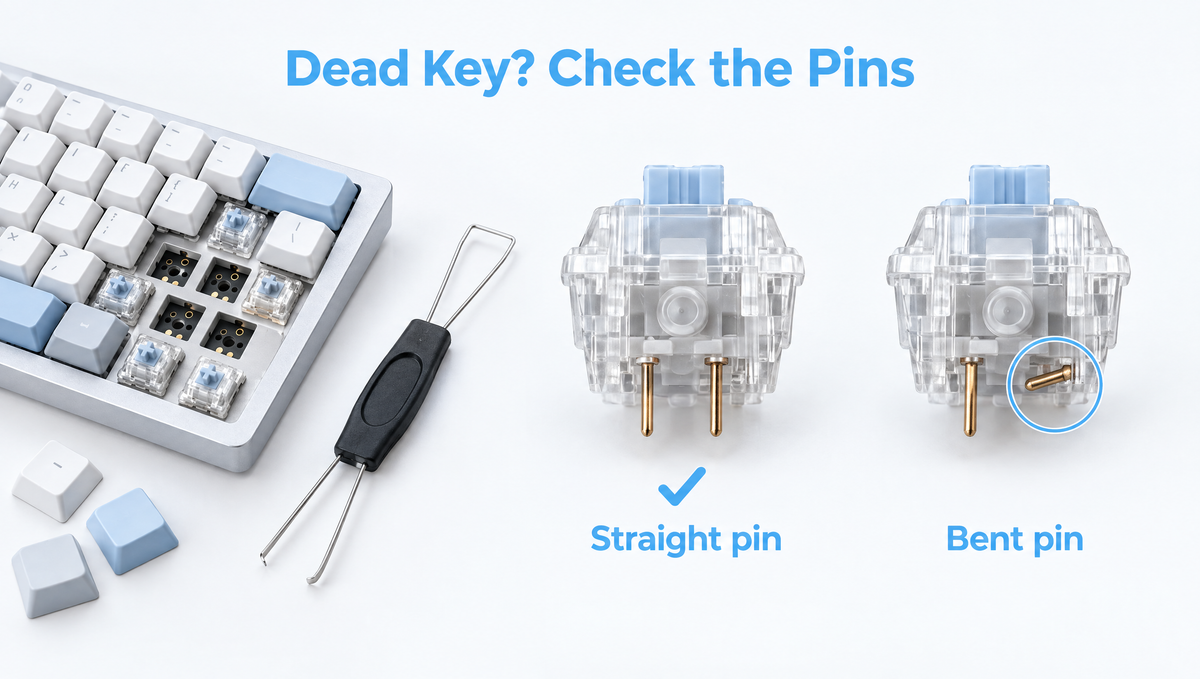
Hot-Swap Keyboard Key Not Working? Start Here
You swap in a fresh set of switches, plug the board back in, and one key is dead. Maybe it worked before the swap, maybe it only works with the old switch, or maybe it cuts in and out. A key not working on a hot-swap keyboard is one of the most common questions on keyboard forums and subreddits, and the good news is that it almost always has a simple, fixable cause.
In most cases the cause is a bent switch pin, a switch that is not fully seated, or a hot-swap socket whose internal contacts have loosened. This guide shows how to diagnose a dead key step by step, fix each cause safely, and prevent it next time.
How Hot-Swap Sockets Work (and Why Keys Stop Registering)
A hot-swappable mechanical keyboard does not have switches soldered to the PCB. Instead, each key position has a small hot-swap socket soldered to the underside of the board. A standard MX-style switch has two metal pins on its underside, and each pin pushes through a hole in the PCB into the socket.
Inside each socket opening are thin metal contact leaves that press against the switch pin. When you press the key, the switch closes its internal contact, the circuit through those two pins completes, and the keyboard registers the keypress. If either pin fails to touch its contact leaf, the key does nothing.
That design makes swapping easy, but it also explains why switch not registering problems happen:
- The pins are thin and bend easily if a switch goes in at an angle.
- The contact leaves inside the socket can be pushed open and stay open, especially after a switch with thicker pins has been installed.
- The socket itself is held on only by its solder joints, so pressing a switch in hard with no support behind the PCB can crack or lift it.
- Sockets have a finite life. Kailh, one of the most widely used makers of MX-style hot-swap sockets, rates its sockets for around 100 insertion cycles.
Step 1: Confirm It Is Really a Hardware Problem
Before pulling anything apart, rule out the quick stuff:
- Test in plain text. Open a text editor and press the suspect key several times, then compare it to its neighbors. Note whether it fails every time or only sometimes.
- Use a key tester. If your board supports VIA, its key tester view shows exactly which keys register. Any online keyboard tester works too.
- Check your keymap and layers. A key that was remapped to nothing, or a stuck layer, looks identical to a dead switch. Resetting the keymap to default in your keyboard software is a quick way to rule this out.
- Try another cable, port, or connection mode. If several keys fail at once, or the whole board acts strangely, the issue is more likely connection or firmware related than a single socket.
If one key fails consistently while everything else works, it is almost certainly the switch, its pins, or its socket. Keep going.
Step 2: Pull the Switch and Check for Bent Pins
Bent switch pins are the number one cause of a dead key after a swap. Unplug the keyboard, remove the keycap, and pull the switch straight up using a switch puller that grips the top and bottom clips of the housing. If you are not sure of the technique, our guide on using a keycap puller and switch puller without damage covers it in detail.
Now look closely at the two metal pins on the bottom of the switch:
- A pin that is folded flat against the housing never reached the socket at all.
- A pin that is bent at a slight angle may only make partial contact, which causes intermittent keypresses.
- A pin that looks straight means the problem is more likely the socket or seating.
To fix a bent pin, gently straighten it with tweezers or small needle-nose pliers, a little at a time. The pins are soft metal and will tolerate a careful straightening, but repeatedly bending the same pin back and forth can weaken it. If a pin snaps or is badly kinked, replace the switch. This is one reason it is worth ordering a few spares whenever you buy a set from our key switches collection.
Step 3: Reseat the Switch Correctly
A switch that is not fully seated can look fine from above while its pins sit just short of the socket contacts. Reinstall the switch like this:
- Line the switch up so its pins match the holes in the PCB, using the orientation of the neighboring switches as your guide.
- Lower it straight down, not at an angle, until the pins start to enter the holes.
- Press evenly on the top of the housing until the clips snap into the plate. It should seat with firm, steady pressure, not force.
- If you feel hard resistance, stop, pull the switch, and check the pins again. Forcing a misaligned switch is exactly how pins fold over.
If your board is out of its case, support the PCB from behind while you press, directly under the socket. Pressing switches into an unsupported PCB is how sockets get pushed off their solder pads.
The 5-Pin vs 3-Pin Trap
Many switches are 5-pin switches, with two extra plastic alignment legs beside the metal pins. If your PCB only has holes for 3-pin switches, those legs will hit the board and the switch cannot seat fully, so the key never registers. The fix is to carefully clip the two plastic legs flush with flush cutters. Do not cut the metal pins. Our explainer on 5-pin vs 3-pin switches shows the difference.
Step 4: Run the Tweezer Test on the Socket
If the switch pins are straight and the switch is seated but the key still does nothing, test the socket directly. This is the classic tweezer test the keyboard community uses:
- Remove the switch so the two socket holes are exposed. Plug the keyboard in and open a key tester.
- Take a pair of metal tweezers and touch one tip into each of the two socket holes at the same time, bridging them.
- If the key registers, the PCB, diode, and socket circuit are all working, and the problem is with the switch or the contact between pin and socket.
- If nothing registers, the fault is deeper: a lifted socket, a broken solder joint, or a PCB-level problem.
Only do this on a standard mechanical hot-swap board. The tweezer test does not apply to magnetic Hall effect boards, which are covered below.
Step 5: Fix Loose Hot-Swap Socket Contacts
The most frustrating result is a socket that passes the tweezer test but still will not work with a switch, or a key that works with one switch but not another. The usual cause: the thin contact leaves inside the socket have been spread open, often by a switch with slightly thicker pins, and no longer press against a thinner pin.
There are two ways to deal with it:
- Quick workaround: give the switch pin a very slight bend before inserting it, so it presses against the contact leaf. This works but is a temporary fix.
- Proper fix: with the board disassembled and the PCB accessible, look into the socket from behind. Using fine tweezers or a small flat tool, gently push the contact leaves back toward their original position so they close the gap. A magnifier or your phone camera zoomed in makes this much easier.
Work slowly. The leaves are tiny and easy to overbend.
When the Socket Itself Is Damaged
If a socket has visibly shifted, sits lower than its neighbors, or fails the tweezer test, it may have lifted from its pads. Options from easiest to hardest are pressing it back into position, reflowing its solder joints with a soldering iron, replacing the socket entirely, or, if the copper pad has torn off the PCB, running a small jumper wire to restore the connection. Anything involving a soldering iron is best left to someone comfortable with basic electronics repair, and it may affect your warranty, so contact the manufacturer first if the board is still covered.
Dead Key on a Magnetic or Hall Effect Keyboard
Magnetic switches work differently. A Hall effect keyboard does not use metal pins and contact leaves. A magnet in the switch moves over a sensor on the PCB, and the board measures how far the key has travelled. That means bent pins and loose socket leaves are not the cause.
If a key stops working on a magnetic board, check these instead:
- Seating. The switch must sit fully in the plate and directly over its sensor.
- Compatibility. Magnetic boards are designed around specific magnetic switches. A switch that is not supported by your board may read incorrectly or not at all, so check the manufacturer's compatibility list before mixing switches.
- Calibration. After changing magnetic switches, most boards need recalibrating. Our guide to magnetic keyboard calibration explains how to fix dead zones and keys that do not register.
- Actuation settings. A key accidentally set to an extreme actuation point or an odd rapid trigger value can feel dead. Reset its settings in the keyboard software.
You can browse compatible options in our magnetic switches and magnetic keyboards collections.
How to Prevent Bent Pins and Socket Damage
Most dead keys are avoidable. A few habits protect both your switches and your sockets:
- Inspect every pin before installing. It takes seconds and catches pins bent in shipping.
- Insert straight and evenly. Never rock a switch in or push it at an angle.
- Use a proper switch puller. Prying switches out with a screwdriver or pliers can damage housings, plates, and sockets. A two-in-one tool such as the Glacier Keycap/Switch Puller Tool handles both keycaps and MX-style switches.
- Support the PCB. If the board is out of the case, back the PCB under each socket when pressing switches in.
- Test switches outside the board. If you like trying lots of switches, a tester or keychain lets you feel them without wearing out the same sockets over and over. See our guide on whether switch testers are worth it.
- Keep spares. One or two spare switches turn a bent pin from a problem into a thirty-second swap.
You will find pullers and other essentials in our keyboard tools collection.
Frequently Asked Questions About Hot-Swap Keys Not Working
Why does a key work with one switch but not another?
Usually the socket's contact leaves have been spread open, often by a switch with thicker pins, and they no longer grip a thinner pin. Check the new switch's pins for bends first. If they are straight, gently close the contact leaves from the back of the PCB.
Can bent switch pins be fixed?
Yes. Straighten the pin carefully with tweezers or small pliers, then reinstall the switch straight down. If the pin breaks or stays kinked after straightening, replace the switch.
How many times can you hot-swap switches?
Kailh rates its MX-style hot-swap sockets for around 100 insertion cycles. That is far more than most people use on any one key, but frequent switch testing on the same positions will wear sockets faster.
What is the tweezer test on a keyboard?
It is a way to check a socket without a switch. You bridge the two socket holes with metal tweezers while the board is plugged in. If the key registers, the socket and PCB circuit work, and the problem lies with the switch or the pin contact.
Final Thoughts on Fixing a Dead Hot-Swap Key
A dead key after a switch swap feels alarming, but it is rarely a broken keyboard. Work through it in order: rule out software, check for bent switch pins, reseat the switch, run the tweezer test, and only then move on to tightening or repairing the hot-swap socket.


